Blue Tiles
Trader Sam | July 19, 2009
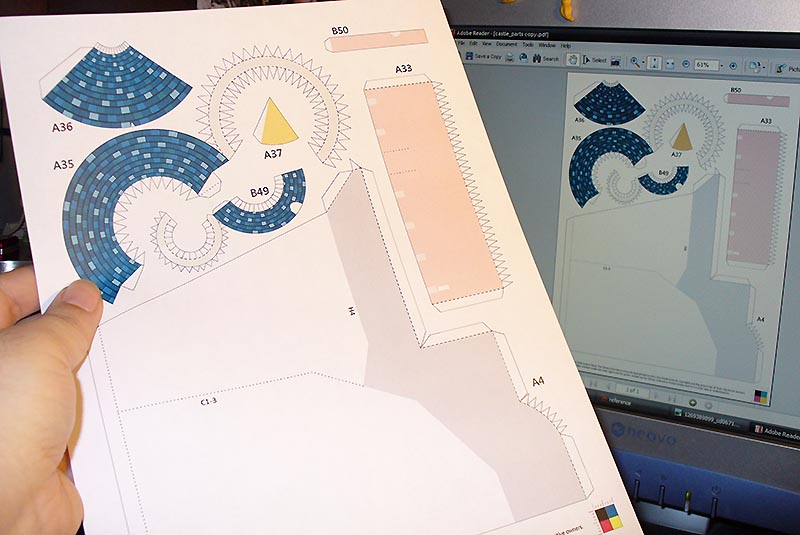
Here it is; the first printed test. A lot of you have been asking for a progress update, so here it is. For a long while, there really wasn’t anything to report, but things got to a point where they quickly moved along.
Here, you see a printed test for the roof tiles, which means that I’ve moved onto doing the graphics in Photoshop. In total, there are 71 printable pages, and a grand total of 693 model pieces. The model also had to be scaled down just a tad, so it will not be as large as originally estimated.
Now for some Craft Robo updates. First off is the problem I was having with the machine both reading the registration marks very slowly and making a loud, grinding sound. It turns out that there’s nothing wrong. Whew! It seems that the last cutting speed is retained in the machine’s memory, and is the speed it automatically starts out with. As for the sound, the slower the blade moves, the louder the machine gets. It can be down right scary at times, but it’s supposed to do that.
Second, I will not be able to offer cutting templates for the models. It’s unfortunate, but unavoidable. The registration marks have to fit within a narrow reading area of the paper, and all of the model parts have to fit within the registration marks. That means the parts would have to be either scaled down significantly, or broken into multiple parts (more so than they already are). That translates into a lot of wasted paper space and many, many extra printed sheets. It’s just not practical.
Since I am using the Craft Robo Illustrator plug-in, I don’t see a way to convert the data into the type of cutting file needed by the Craft Robo program. I could freehand all of the cutting lines in the program itself, but that would take a lot of time and work that I’m not inclined to do.
Testing a few different paper mediums, the Craft Robo does not cut very well. There simply are too many sharp corners that get crumpled, torn, and lifted from the carrier sheet. I’ve tried regular bond paper, thin card stock, and thick card stock, and they all failed. The blame lies in the type of paper used (I much prefer bond paper), the machine’s limitations, and (mostly) my model designs.

In the end, we’re all stuck cutting the pieces out by hand. I’ll try to use the machine to cut out some of the tedious, delicate parts, but everything else will have to be done the old-fashioned way.
Although I bought the Craft Robo specifically for aiding me in creating my paper models, it was still a good investment. I’m always designing something new that needs to be cut out. Perhaps I’ll design some paper crafts that are better suited for the machine.
Ah ha! I knew I’d find a great use for the Craft Robo! For the past few years, I’ve been tinkering with the possibility of handing out small, original papercrafts for Halloween in lieu of candy (or with a piece of candy). Well, this year, I actually did something about it.
I just finished a Dracula’s Coffin prototype. The papercraft is all cut and scored with the Craft Robo, so there are no printed cut/fold lines, which makes the item very clean and professional. Simply pop-out the pieces, and assemble with tiny dots of glue.
I have my California Sleeping Beauty Castle inside a museum glass (custom made of course) and this prevent dust mostly.
Hiya!
Maybe the robo would work better for the castle pop-up card you’ve been working on?
Doubtful. There are a lot of fine points and details that can only be cut by hand. I’ve thought about it, but I haven’t gotten around to playing with those pieces yet.
Hi Sam,
The printed sheet looks great and just like the real thing! it’s to bad that the machine is not working quit proberly, but i prefer cutting by hand that way, it will be a design made by hand.
I have aLso an other question? have you got a tip to prevent my californian model to loses it’s colors by sun light. i’ve was thinking to put it behind glass but there is no glass that fit’s my castle model yet!
Keep up the good work!
Hmmm . . . For one, keep it out of direct sunlight as much as possible. Less exposure to indirect sunlight is even better.
Glass isn’t going to help unless you use something that offers UV protection. This type of glass is sometimes referred to as “museum glass,” because many museums use it to help protect artwork from fading. It doesn’t completely protect against UV damage, but it will make colors last much, much longer.
Anyone else have any tips?